Here are the detailed steps to deploy an ASP.NET Core application to Azure App Service:
- Create an Azure App Service:
- Log in to your Azure portal (https://portal.azure.com/)
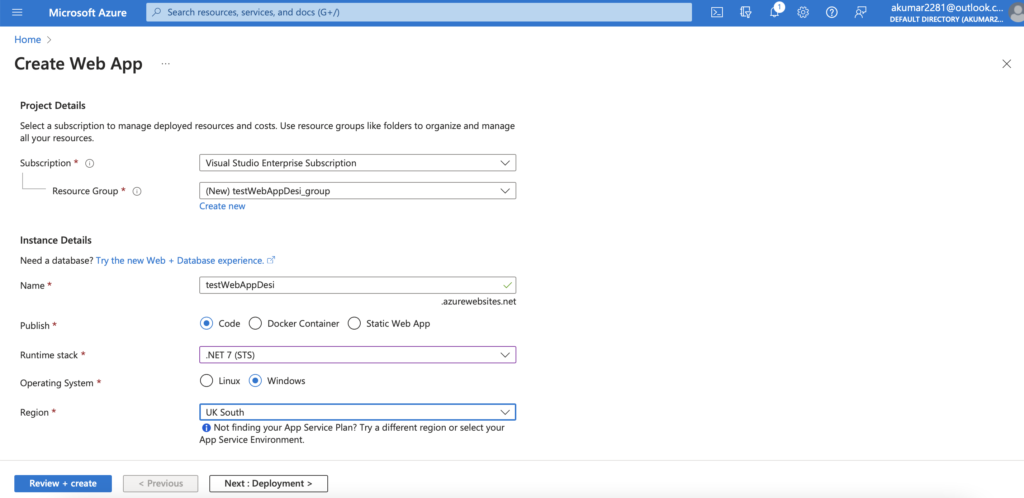
- Click on “Create a resource” button (+) in the top left corner and select “Web App”
- Choose a unique app name, subscription, resource group, operating system, runtime stack (for example, .NET Core 3.1 or .NET 5), and region. Click “Review + create” to review the settings and then click “Create” to create the web app.

- Publish the ASP.NET Core application to Azure:
- Open your ASP.NET Core project in Visual Studio
- Right-click on the project in Solution Explorer and select “Publish”
- Choose “Azure” as the publish target and select your subscription and web app name that you created in the previous step
- Configure the publishing settings as per your requirements, such as Configuration, Target Framework, and Deployment Mode, then click on “Create Profile” button.
- In the next window, click on the “Publish” button to deploy the app.
- Test the deployed application:
- Once the deployment is complete, go to the Azure portal and navigate to your web app
- Click on the “Browse” button in the top toolbar to launch your web app
- Verify that the app is running correctly by testing its functionality.
That’s it! Your ASP.NET Core application is now deployed and running on Azure App Service.